How to Edit Interior Renders with Nano Banana
Learn how to use Nano Banana in ReRoom to turn 3D models into realistic interiors, replace furniture, change materials, and insert new objects.
Why use AI prompts for interior design edits?
In interior design workflows, many revisions are not about redesigning the entire space. They are often precise edits: turning a 3D model into a realistic photo, replacing a sofa, changing furniture material, or placing a new object into an existing room.
In this tutorial, we’ll use Nano Banana in ReRoom to test four common interior design scenarios. The goal is not to replace the designer’s judgment, but to help create proposal-ready interior visuals faster during early-stage design.
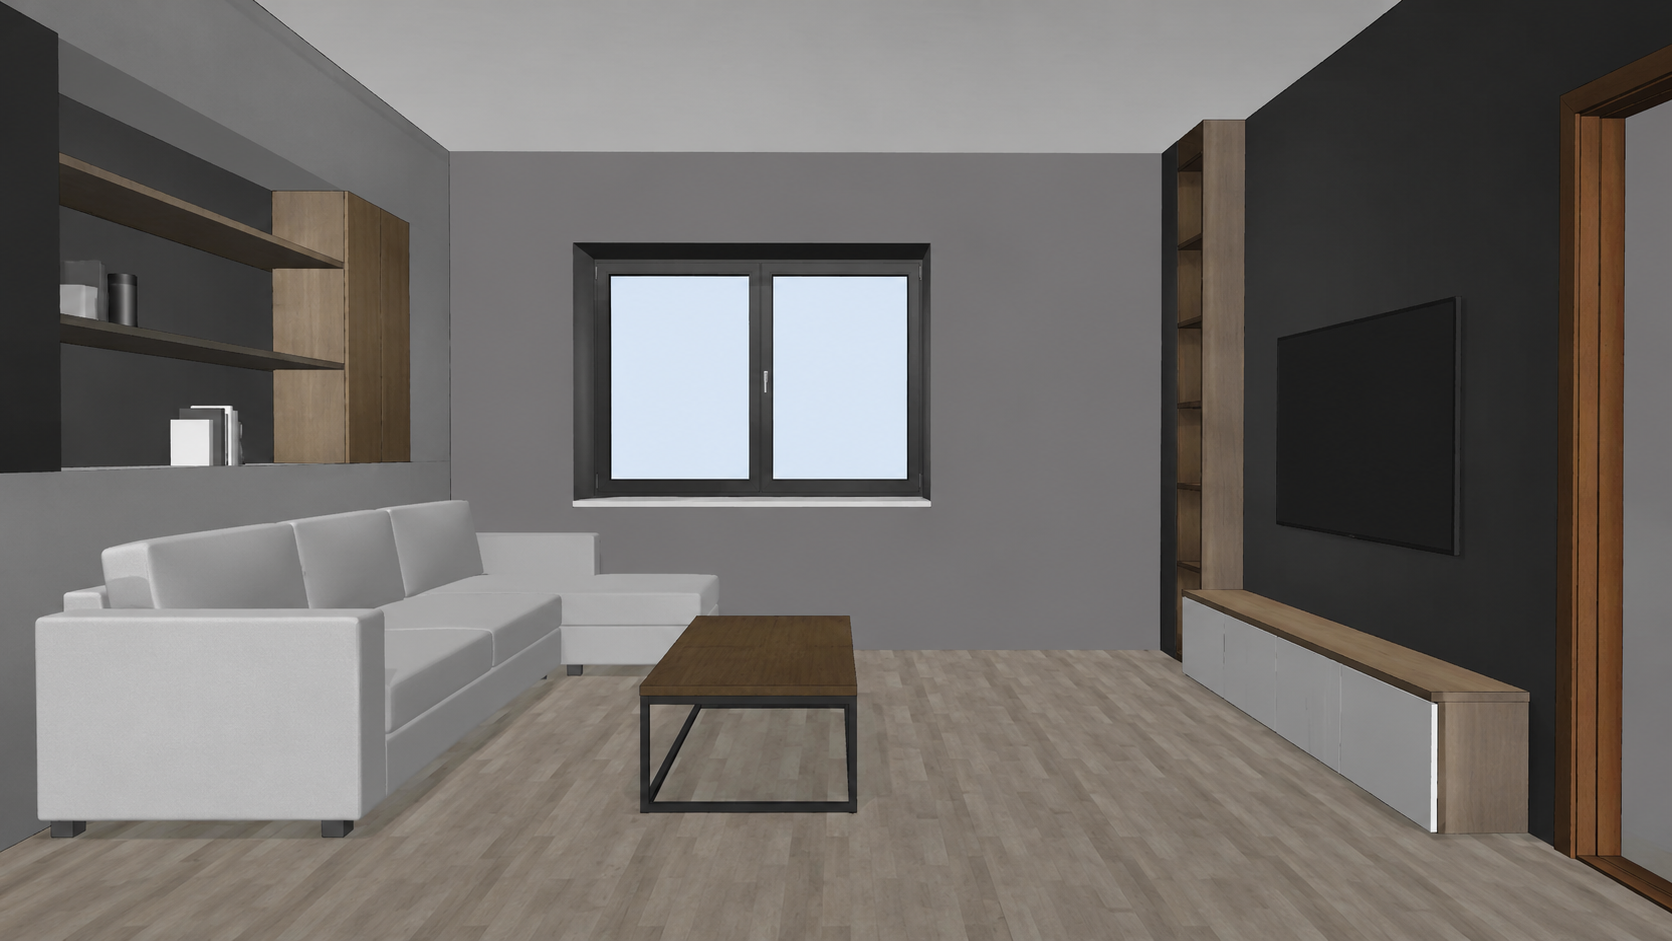 Figure 01. Starting from an interior 3D model or an existing render to test different AI editing scenarios
From our tests, the most important part of an interior prompt is not making the description sound luxurious. It is clearly defining what should be preserved and what should be changed.
If the edit target is not restricted, the model may also change the walls, furniture layout, lighting, camera angle, or surrounding decor.
Step 1 — Log in and prepare your interior image
First, log in to ReRoom and prepare the image you want to edit.
This can be a 3D interior model, a design render, or an existing proposal image. Before uploading, check whether the room layout, camera angle, furniture placement, wall openings, and lighting direction are clear.
If the original image is too rough or the furniture is difficult to read, the AI may reinterpret the space more aggressively. For controlled edits, a clear base image usually produces more stable results.
Step 2 — Go to Home and select Nano Banana
After logging in, go to the ReRoom home page and select Nano Banana.
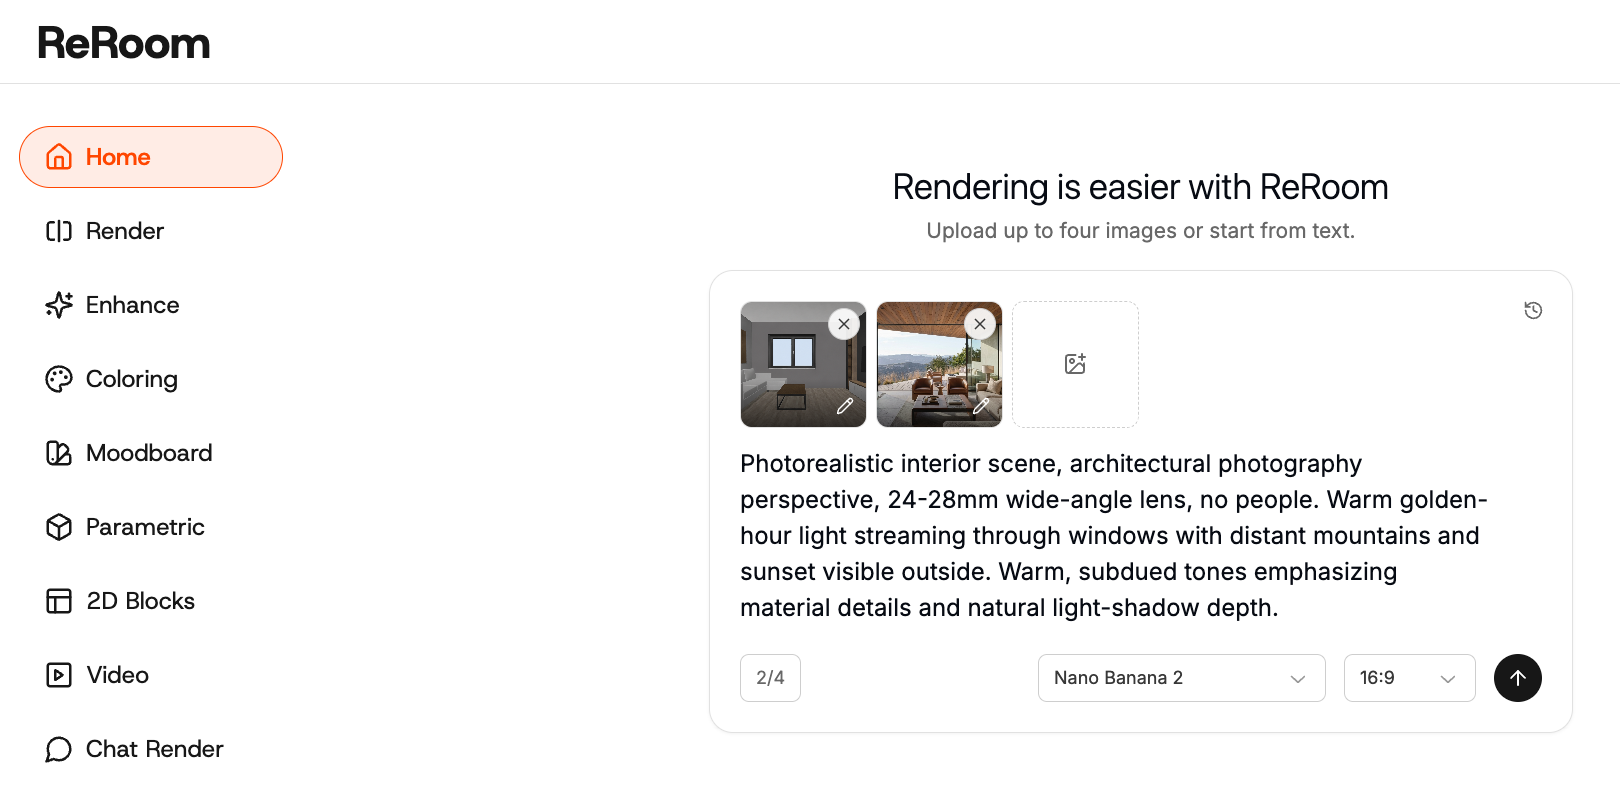
Use the uploaded image as the main reference. The key is to decide whether your task is a full image transformation or a local edit.
For example, turning a 3D model into a realistic interior scene is a broader transformation. Replacing only a sofa, changing only a fabric color, or inserting one furniture item requires a much stricter prompt.
Step 3 — Turn a 3D model into a realistic interior render
The first scenario is turning a 3D interior model into a photorealistic interior image.
For this task, the prompt should preserve the original layout, furniture placement, openings, camera angle, and proportions while adding realistic materials, natural light, and photographic atmosphere.
Photorealistic interior scene, architectural photography perspective, 24-28mm wide-angle lens, no people. Warm golden-hour light streaming through windows with distant mountains and sunset visible outside. Warm, subdued tones emphasizing material details and natural light-shadow depth.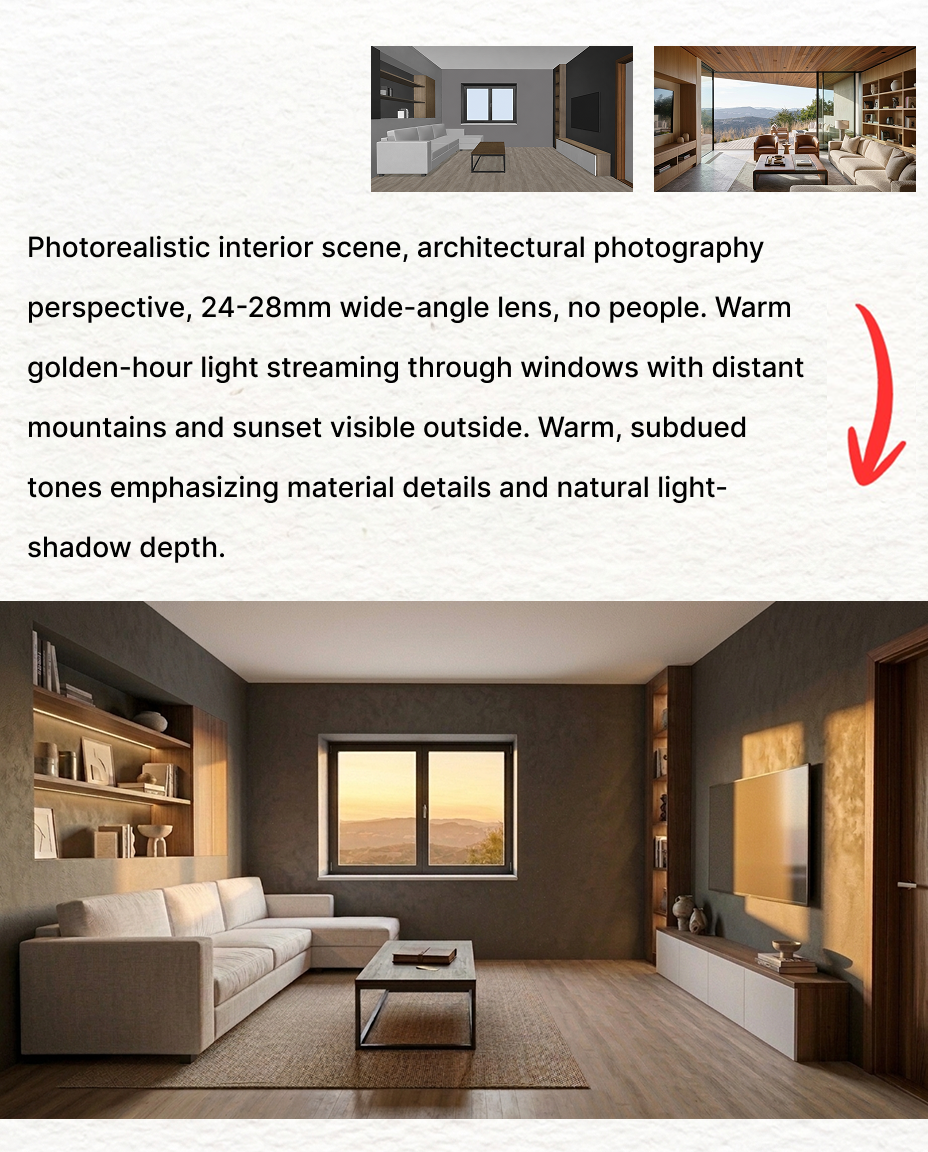 Figure 02. Converting an interior 3D model into a realistic dusk interior scene
One issue we found is that if the prompt starts with words like luxury, cinematic, or dramatic lighting, the model may redesign the room too much.
That is why we start with preserve the original layout, then add photorealistic interior photograph and dusk natural light. This tells the AI that the task is a visual transformation, not a redesign.
Step 4 — Replace only one furniture item
The second scenario is furniture replacement.
For example, if we want to keep the entire room but replace only the sofa with a different style and material, the prompt needs to restrict the editing range clearly.
Replace only the sofa with the style, material, color, and fabric texture shown in Image 2. All other elements, furnishings, and decor remain unchanged. Maintain the original camera angle, composition, lighting direction, and overall color tone.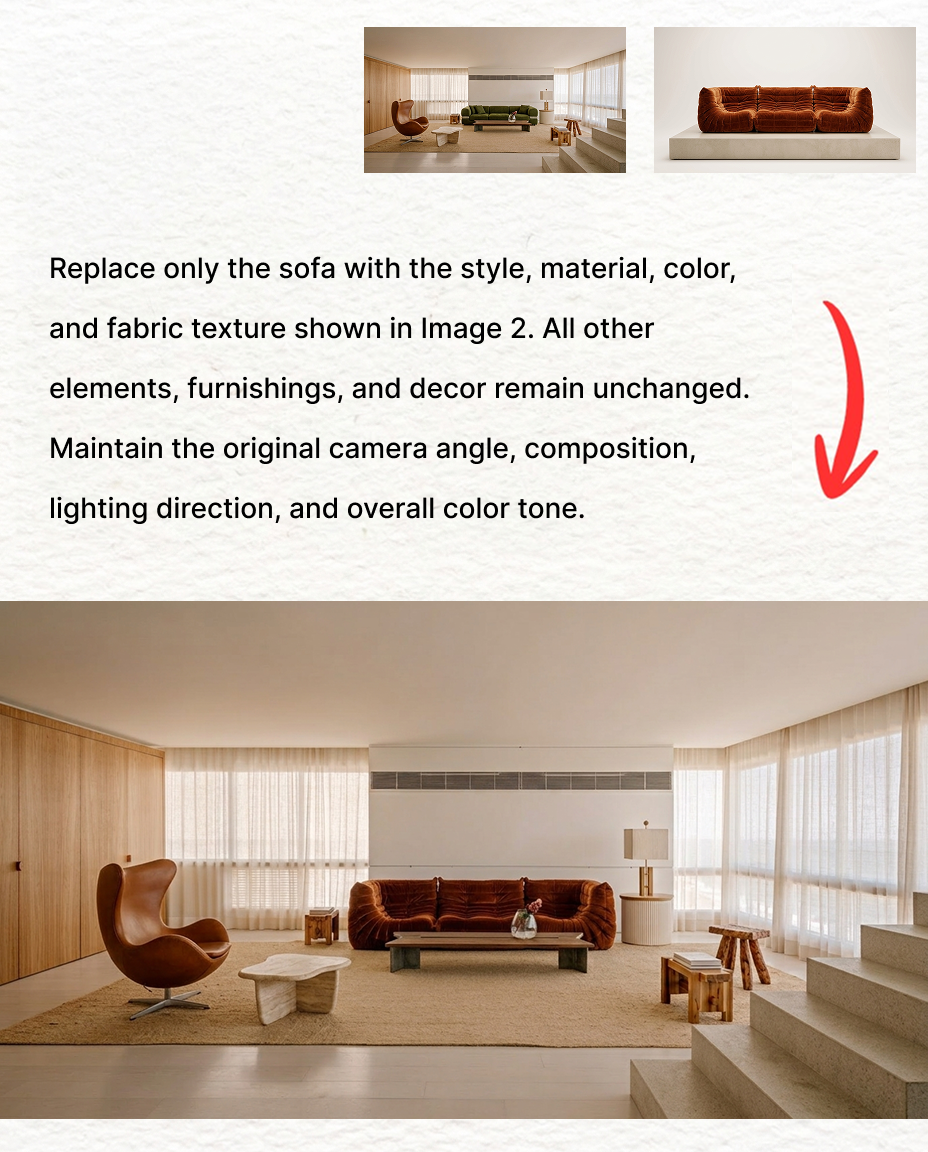 Figure 03. Keeping the room unchanged while replacing only the sofa style and material
The most important phrase here is replace only. It helps reduce the chance that the model will also change the rug, wall finish, lighting, or other furniture.
If the prompt only says change the sofa, the model may reinterpret the entire living room style. For client comparisons, this type of controlled edit is useful for testing different sofa proportions, colors, leg styles, or fabric directions.
Step 5 — Change material without changing the object
The third scenario is material replacement.
This is different from furniture replacement. The object itself should stay the same. Only the surface material, color, or texture should change.
Modify only the sofa within the red-marked area, replacing its material with deep green velvet featuring soft sheen and fine texture. All other elements, materials, tones, lighting, and overall atmosphere remain unchanged.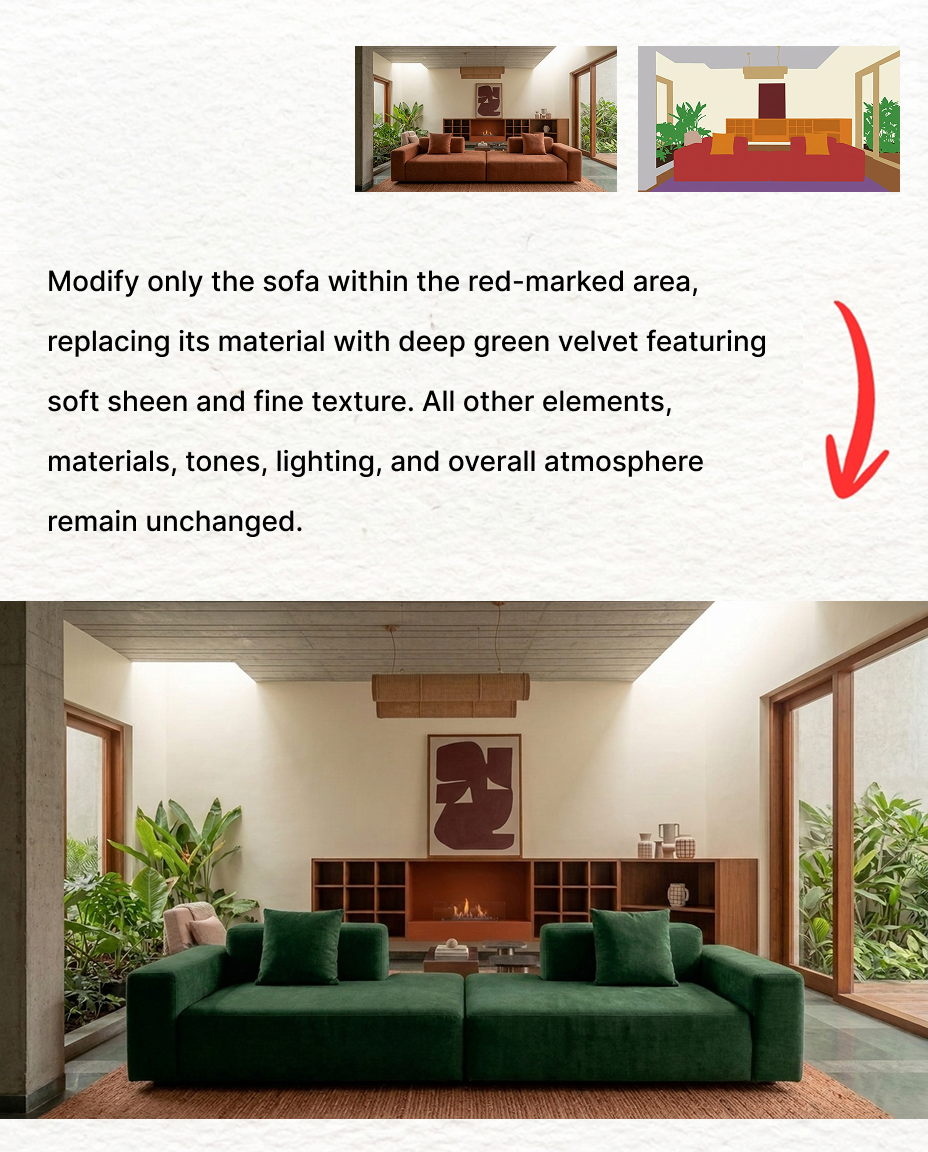 Figure 04. Changing only the sofa material and color while keeping the rest of the scene unchanged
The common problem is that the model may interpret “material change” as “style change.” For example, when changing a fabric sofa into leather, the sofa shape may also change.
To reduce this issue, we use instructions such as keep the exact same sofa shape, size, position.
For interior design, this workflow is useful for testing fabric, leather, wood veneer, stone, metal, wall paint, or upholstery directions without rebuilding the entire image.
Step 6 — Insert furniture into an existing interior scene
The fourth scenario is furniture insertion.
In this workflow, we usually provide a furniture reference image and specify where it should be placed in the interior scene. The challenge is not simply pasting the object into the image. The furniture needs to match perspective, scale, lighting, shadow, reflection, and floor contact.
Place the provided furniture only in the designated area; all other parts remain completely unchanged. Maintain original lighting, shadows, perspective, proportions, and camera angle. Inserted furniture must blend naturally into the scene with correct grounding, lighting, and scale.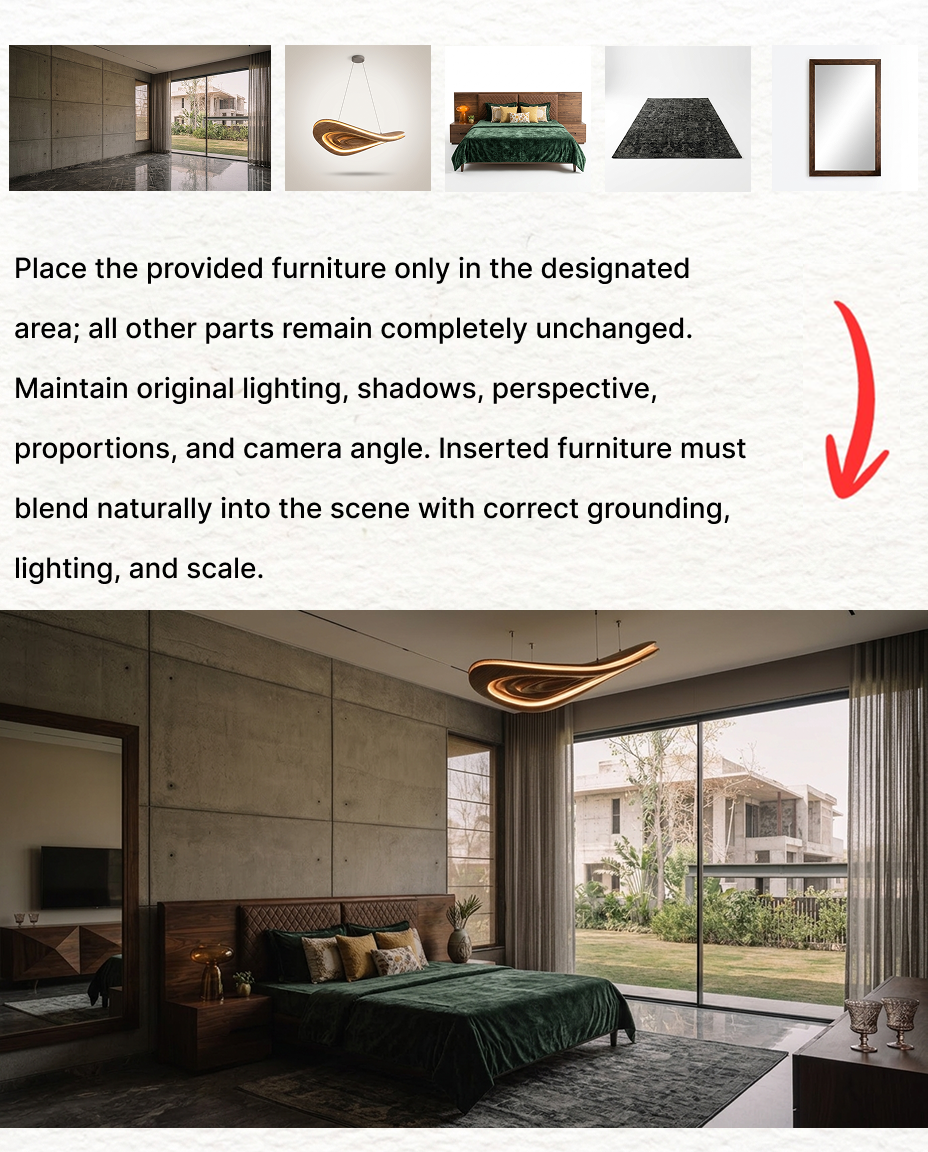
Figure 05. Placing a provided furniture item into a marked area while matching light, scale, and perspective
We specifically include floor contact because furniture that does not sit correctly on the floor will look like it is floating.
Lighting direction and shadows are also important. Without them, the inserted furniture may look like a pasted object instead of something that belongs in the room.
This workflow works well for furniture styling, soft furnishing proposals, product placement, and client selection discussions.
What this workflow changes
This workflow helps designers use text prompts to complete common interior design edits: 3D-to-realistic transformation, furniture replacement, material change, and furniture insertion.
Nano Banana still requires manual review for camera angle, object proportion, floor contact, material consistency, and whether untouched areas were accidentally changed. In client proposals or commercial interior visuals, even small furniture scale or material errors can be noticeable.
But for early-stage proposals, this workflow helps designers test multiple interior options without repeatedly opening Photoshop or rerendering the full 3D scene. It turns a time-consuming editing process into a more controllable and repeatable prompt workflow.
Related posts

How to Create Planting Design Boards with AI
A planting design board is not just a plant collage. It turns climate, water use, and atmosphere into a clear proposal direction.
Willy·Jul 24, 2026
How to Turn Static Renders into AI Walkthrough Videos
A static render can become more than a single image. With the right video prompt, it can turn into an immersive spatial walkthrough.
Willy·Jul 21, 2026
How to Guide AI Design with Annotations
Sometimes drawing directly on the image is more accurate than writing a longer prompt.
Willy·Jul 16, 2026